
“May abundance and joy fill your home this Thanksgiving Day”.

“May abundance and joy fill your home this Thanksgiving Day”.

I don’t know the author of this Irish blessing, but its perfect for today!
“For each petal on the shamrock
This brings a wish your way
Good health, good luck and happiness
For today and every day”


Thought I’d hop on to check in and wish everyone a very early spring greeting although it’s hard to feel springish while there’s blizzard conditions blowing and snowing in our part of Iowa today. A few days ago robins were hopping around our yard and today I’m worried about where all those poor little things went to stay safe and warm.
I’ve been in a bit of a funky mood since Christmas and haven’t done much creatively. But, with winter on its way out, I think I’m getting my mojo back.
I started getting back in the groove last week with a new St.Patrick’s Day suncatcher (shown above), and there’s a shamrock piece waiting on my workbench to be finished.
Last summer I cut a lot of vintage glassware into interesting pieces to create something special with but didn’t follow through. They are next on the agenda along with 4 or 5 other unfinished crafting projects that are taking up space in my work area.
Every year I make quite a few stained glass, peace sign suncatchers. I’m ready to put those aside for a while and put my energy into more new pieces and ideas. The last of my peace sign suncatchers are listed in my Etsy shop https://www.etsy.com/shop/GlassicArtistry and pictured below if anyone has an interest.


Well, I guess that shamrock piece isn’t going to finish itself, I’d better get back to work. Stay well and stay safe friends, and Think Spring!

Happy New Year Greetings! I wanted to share a little after Christmas fun before saying goodbye to 2024. It was inspired by many similar ideas posted on Pinterest and an experimental, kiln melted, bottle piece I was saving. Remember this awkward looking piece from a previous post? https://glassictouch.com/2023/10/01/recycled-bottle-kiln-play-diy/

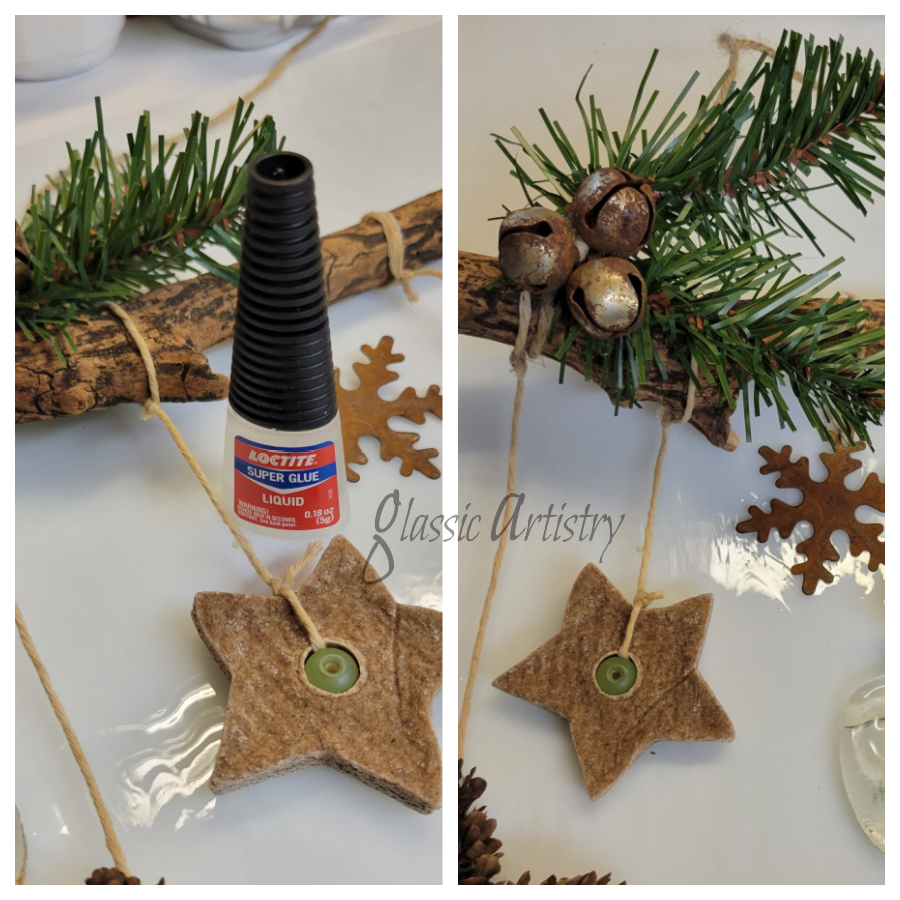
Jute twine was used as a hanger, but wanting a thinner, natural looking string to hang my items with, I soaked white cotton string in coffee.
I found this project easier to do while the stick was hanging on a nail, but laying it on a flat surface would work as well.
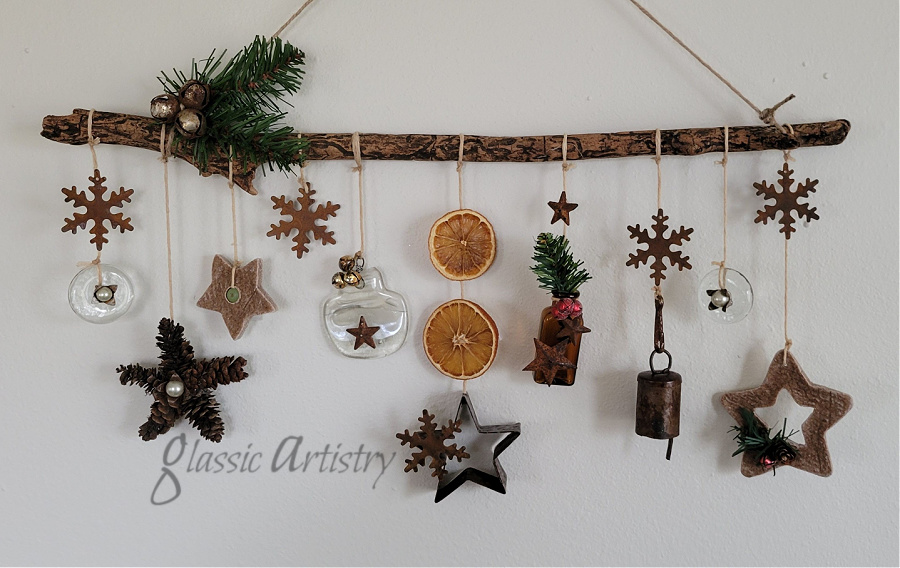
After gathering a variety of pieces from my rusty/crafting stash, and sanding/staining an old stick that was approximately 21” long, bits and pieces were put together to tie on.
Along with the melted bottle I used clear glass donuts, mini pinecones, star cookie cutter, stars, cinnamon ornaments that were made several years ago, small brown bottle, bells, dried orange slices, metal snowflakes cut from a rusty garland, and faux greenery. The small pearl embellishment in the center of the glass donuts were made by gluing a pearl in a small opened up bell.
When finished, I put a drop of super glue on every knot for reinforcement.


I absolutely loved this project. So much fun! There’s never ending ways you can do it. Can you imagine a big long one, maybe hanging over a couch at Christmas time? And think of all the seasonal themes; I’m already thinking hearts!
Comment, like and share if you wish. I’ll be back with more in 2025!
The day after Christmas seems a little late to post another update on my garden path, but honestly, it’s the first chance I’ve had. I get buried in my glass work beginning October and don’t allow much time for anything else except my grandkids’ sports activities.
At the end of my last post I was getting ready to add salvaged barrel rings in my garden. I was pretty sure the barrel rings would each take a whole bag of 60 lb. concrete mix. Knowing I wouldn’t be able to stir up that much concrete by myself, even if I mixed it in three small batches, I asked my husband if he’d help me stir and this is the answer I got …

I should have asked a lot sooner, lol. His help was still needed and appreciated because I couldn’t lift the heavy bags to pour them in. He also kept the mixer going and handed me buckets of mixed concrete as I needed it so I wouldn’t have to keep getting up and down off the ground.
A barrel ring isn’t very high so we stacked two together for added height and attached them together with scraps of steel and self tapping screws. The protruding screw ends on the outside of the rim were cut off.

Circles were dug in the garden to accommodate half the depth of the joined rings. The ground was tamped down well before sprinkling in a thin layer of sand, then tamped again.
Earlier I had gathered a bunch of rocks I thought would work well. They couldn’t be higher than the ring and most had at least one flat side. To be more prepared, spare rings were laid next to the ones to be poured and filled with an arrangement of rocks. I laid out more than enough rocks so I had quick options while filling the rings.

The prep work for this project took the most time. Once everything was in place and the concrete mixed, it went rather quickly, especially with the extra pair of hands.
I started with a thin layer of mixed concrete over the sand. Staying a little ways away from the edge of the ring, rocks were added a few at a time, trying to keep level with the top edge of the ring as best I could. With a large spoon I scooped concrete from a bucket and filled in around the rocks as I went, jiggling the rocks a bit to settle it in, until the ring was filled. With a gloved hand, I wiped a thin skim layer of concrete over all to fill in any little holes or spaces.
After the stones dried for about an hour, I wiped them down lightly with a wet rag to smooth the concrete. At this point I could make out the shape and color of the rocks under the concrete.

Being late in the season and with freezing temps expected overnight, the stones were covered with a tarp to hold in the heat.
Early the following morning, I washed the stones lightly again, this time using a rag and a plastic bristled scrub brush before recovering them. Later in the day they were given a final wash and rinse. Mulch was pushed back up around them to see how they looked. I thought they looked great, just what I envisioned.

Even though it’s probably not needed, I decided to keep them covered with a tarp to protect them from ice for their first winter. I guess it will remain to be seen how they look in the spring.
As you can see in one of the pictures above, a large cast iron ring and concrete circle have made it to the garden too. They’re not buried in or necessarily where they will stay. I just had the opportunity to get them moved to the garden and I took it.
I have a few months now to think over my next steps. I have a feeling the new concrete mixer may help me step up my game a little.
For now, I hope you all had a wonderful Christmas and wish you much love and happiness in the New Year!

Back with an update on the progress of my garden stones. I had hoped to be back sooner but the weather has been hit and miss the last two weeks and it’s affecting what I can get done.
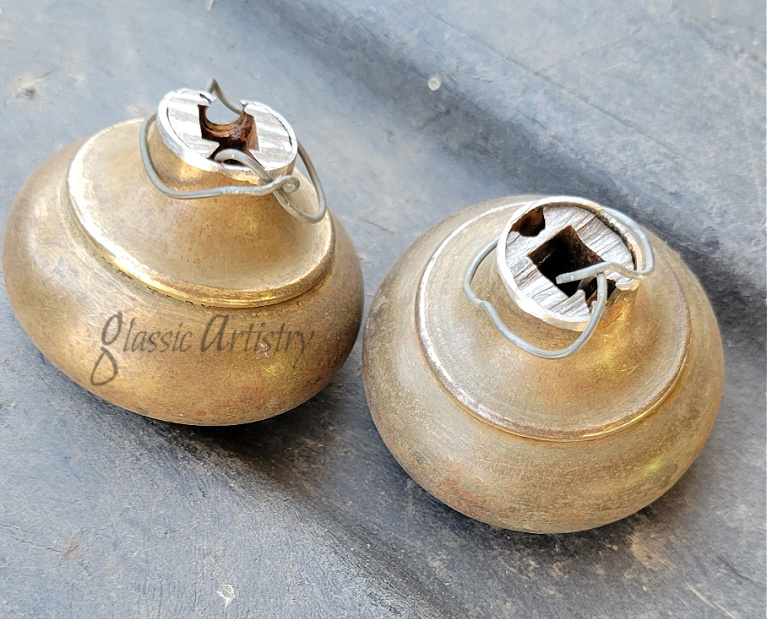
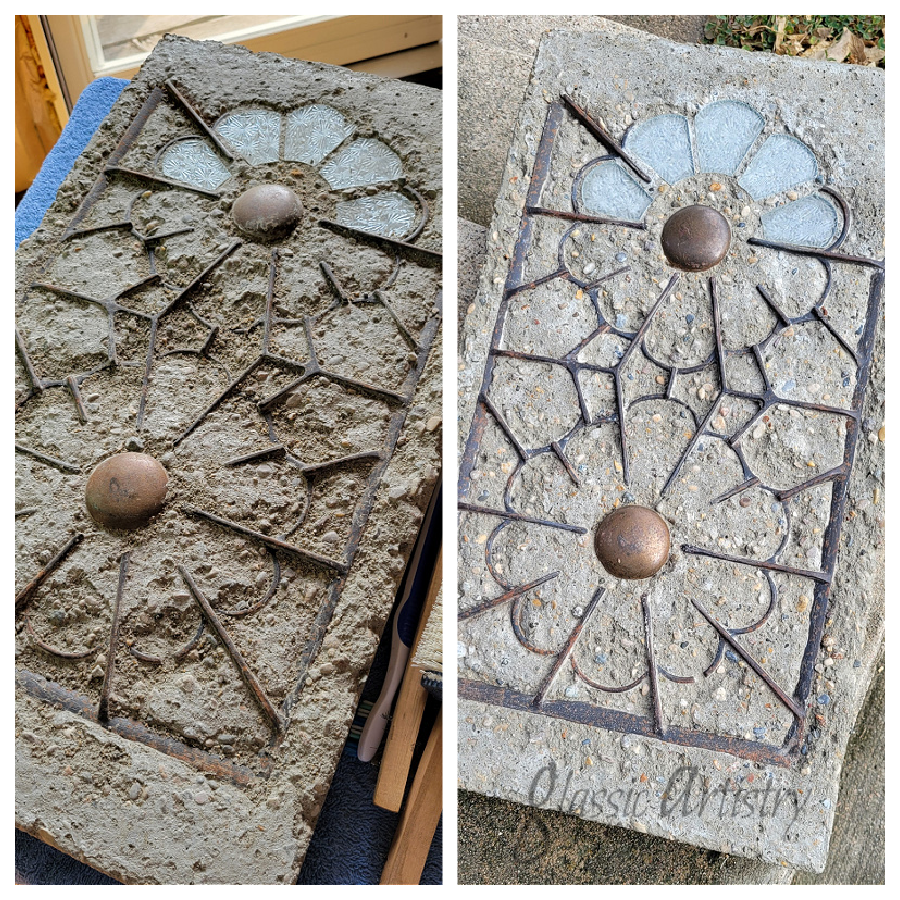
I really wanted to do something with the broken burner grid shown at the end of my previous post and couldn’t wait to see how it would turn out. To resemble flower centers, the ends of two brass door knobs were cut off so they wouldn’t hit the chicken wire when they were pushed into the concrete. Because of their smooth tapered shape, wires were twisted in and around them to help secure them in the concrete. Cut and shaped glass petals were pushed gently in place as well. The glass pieces were still loose after an hour or so. I left them in place with the intention of removing them once the concrete was set and then gluing them in, but the next day they were stuck solid. I pushed the grid in a little too far again. As it dried, the concrete rose up quite a bit in some areas. After some scraping and rubbing with steel wool it didn’t look so bad and I’m happy with it. I’d like to make a couple smaller companion pieces for this one, I’m thinking on it.
I’m making more stones with the grid pattern. Again, the iron grids were coated with diesel fuel first so they could be removed. My helpful husband showed me how to give one snug grid a few gentle taps with a hammer and screwdriver to remove it easily.

I left a large grid embedded in one stone. Two bolts were cut off and pushed in on the sides too just for the heck of it.

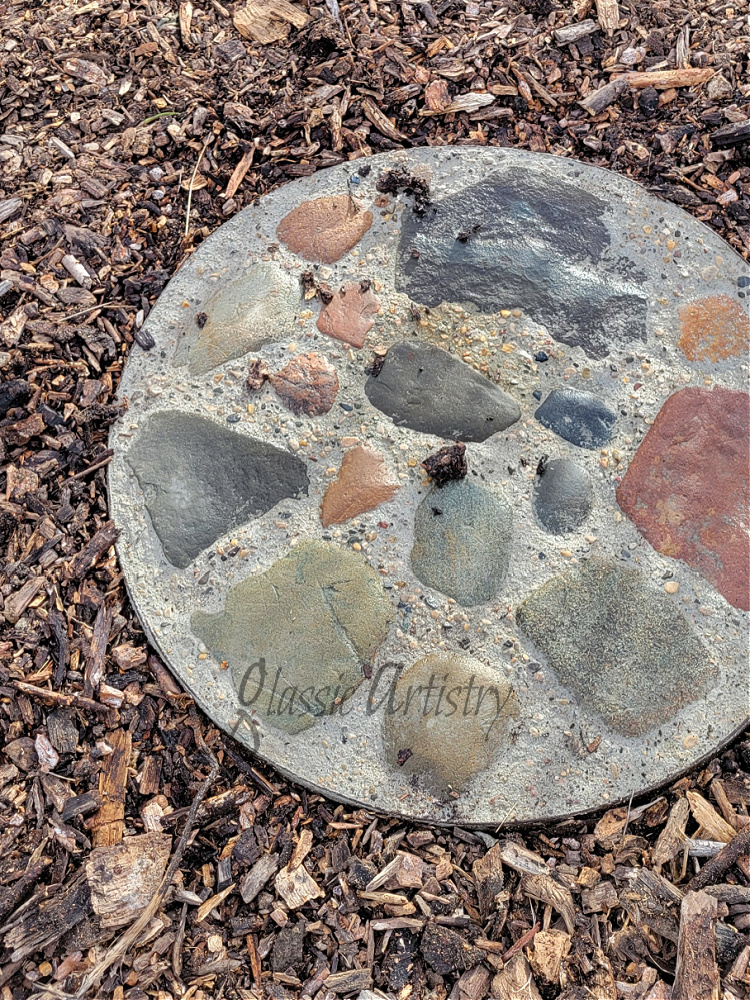
I’ve come to the conclusion that pouring four stones in an afternoon is my limit, especially if I’m making the larger ones. I start getting tired. That was the case with my first rock stone. I wouldn’t have done it if the wooden form hadn’t been pre-prepped and the wire reinforcement already cut.
I hurriedly grabbed a scoop of dirty sand from the garden along with any flat rocks I could see and a handful of smaller rocks. I gave all the rocks a quick dunk in a bucket of water to get the dust off. The flat rocks were laid face down over a thin layer of sand. The smaller rocks were laid and pushed into the bare spots.
I should have gone slower, but I did try to fill the cracks around the rocks first as I added a thin layer of concrete. A piece of chicken wire was added and then covered with concrete to fill the form.
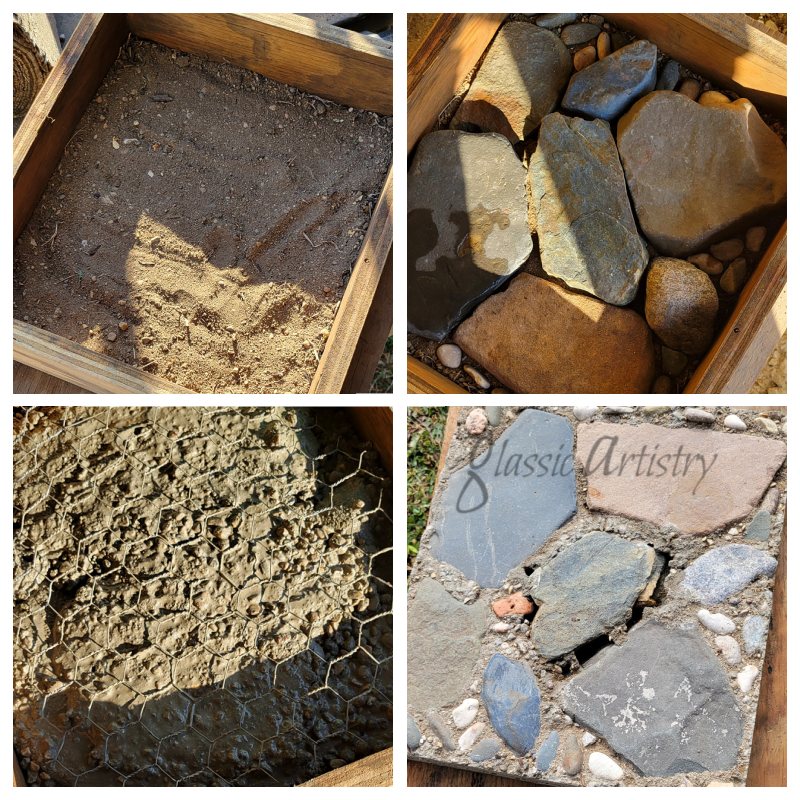
When it was unboxed and brushed clean you could see I didn’t get concrete in all the cracks, but I don’t think that’s terrible. I’ll get back to that problem a little later.
I’ve always wanted to make a bottle cube so I’m sharing this last one before I go. I love this one. It’s also small enough that I can make them and others like them in my basement over the winter to be ready next spring.
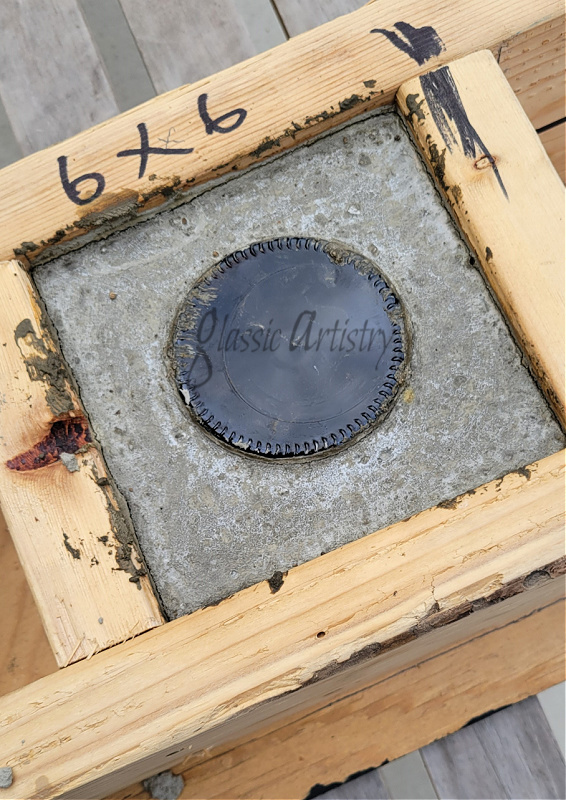
The inside of the wooden form was 6” x 6” x 5” deep. A glass saw was used to cut the bottoms from two beer bottles. A bottle cutter or wet saw would work too. The cut edges were lined up and taped together with clear label tape creating a cylinder shape. The cylinder measured 4 ½”H x 3 ½” W. Needing only a small amount of concrete for this one, I was able to mix it up in an ice cream bucket. The flat top and bottom surfaces of the bottles were wiped lightly with diesel fuel before centering and standing the cylinder in the prepped form. The cylinder was held down firmly while spooning in the concrete, concentrating on getting it in the corners and filled in around the bottom of the cylinder. Continuing to hold the glass firmly, the form was shaken gently to settle the concrete. I don’t know if it made a difference or not, but I sat a small rockon the cylinder, no wider than the glass, until the concrete was dry.

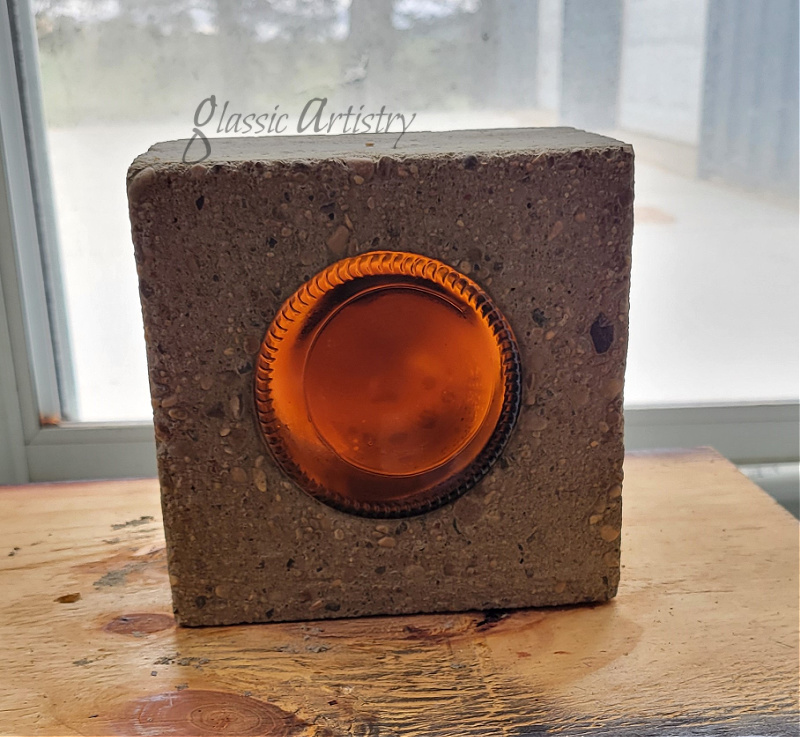
After setting close to 24 hrs, it was removed from the form to finish drying. Any excess concrete was cleaned off.
Unfortunately, it’s cold here today with no sun. I had to get a picture of it in the house in front of an open door. I’ll get a better picture ourside when I can. There’s no plan on how cubes like these will be used in the garden yet, but I have the winter to think about it. They’re definitely going somewhere!
There was a tiny bit of concrete left over from the cube so I decided to use it to fill the cracks in the rock stone I had made. I used a nail to kind of poke it down into the crack then topped it off. I gently brushed most of the excess off it after it dried a bit. Looks like it might have worked, time will tell.

Looking at the extended weather forecast, I may have a few good days in the second week of November that will be warm enough to get some of my salvaged circles placed in the garden before the temperatures start dropping below freezing every night.

That’s all for now, I’ll return. Stay well friends!

I hope followers haven’t been thinking I was getting lazy, I’ve not posted in a while. It’s been so dang hot all summer that it’s not been fun to work on many outdoor projects, and the little things I have been getting done were boring. But, the weather has cooled now and I’m raring to get going on the paths for my garden.
No plan, just going to visualize it as I go. I’m adamant about making most of the path stones myself; that’s going to be the funniest part. Preferring an aged, rougher look, I went to the salvage pile to see if there was anything I could work with. I found several interesting things to try and incorporate; we’ll see where things go.
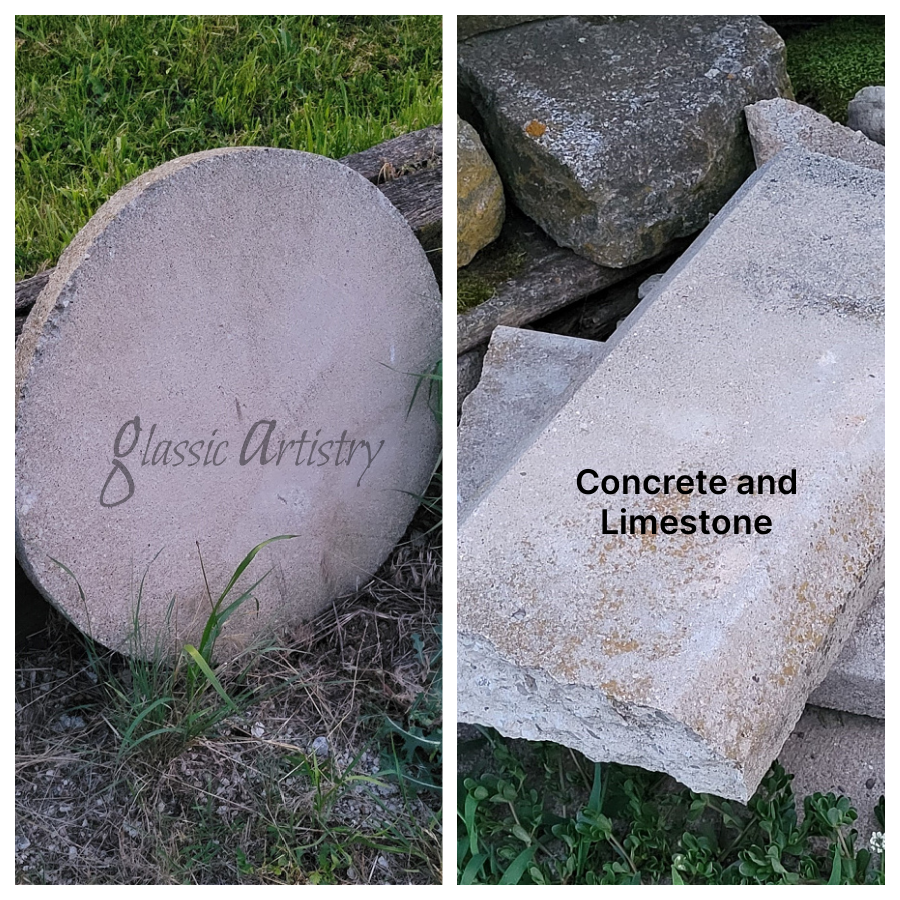


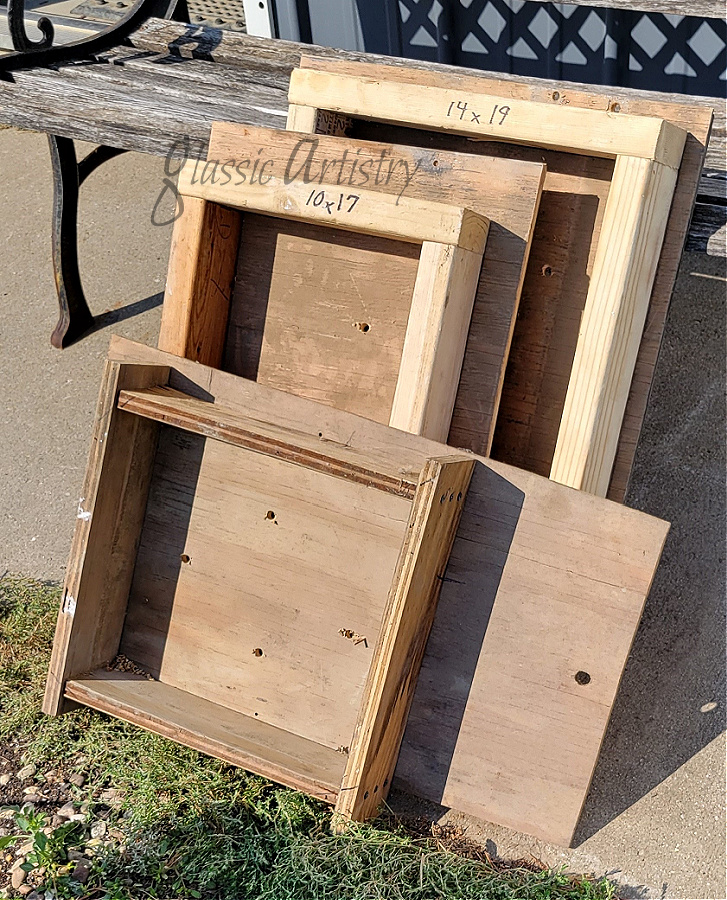
I was anxious to get started so my husband built a couple new boxes for me while I went after some 60 lb bags of General Purpose Concrete Mix as was used in a previous garden stone project https://glassictouch.com/category/for-the-garden/.
Adding a chicken wire reinforcement will be an added step with all of the new stones that are made.
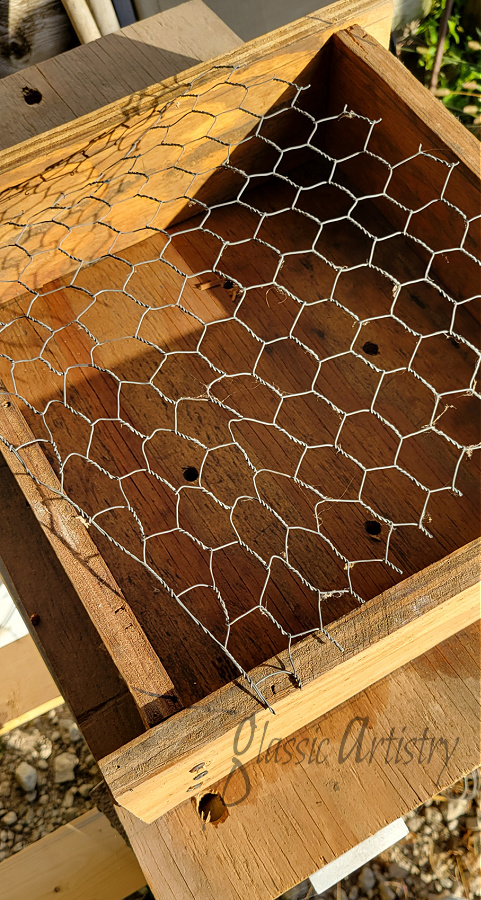
The inside of the wooden forms were brushed with diesel fuel as a release agent. I poured about half of the concrete in a form, laid the wire in, then finished filling.
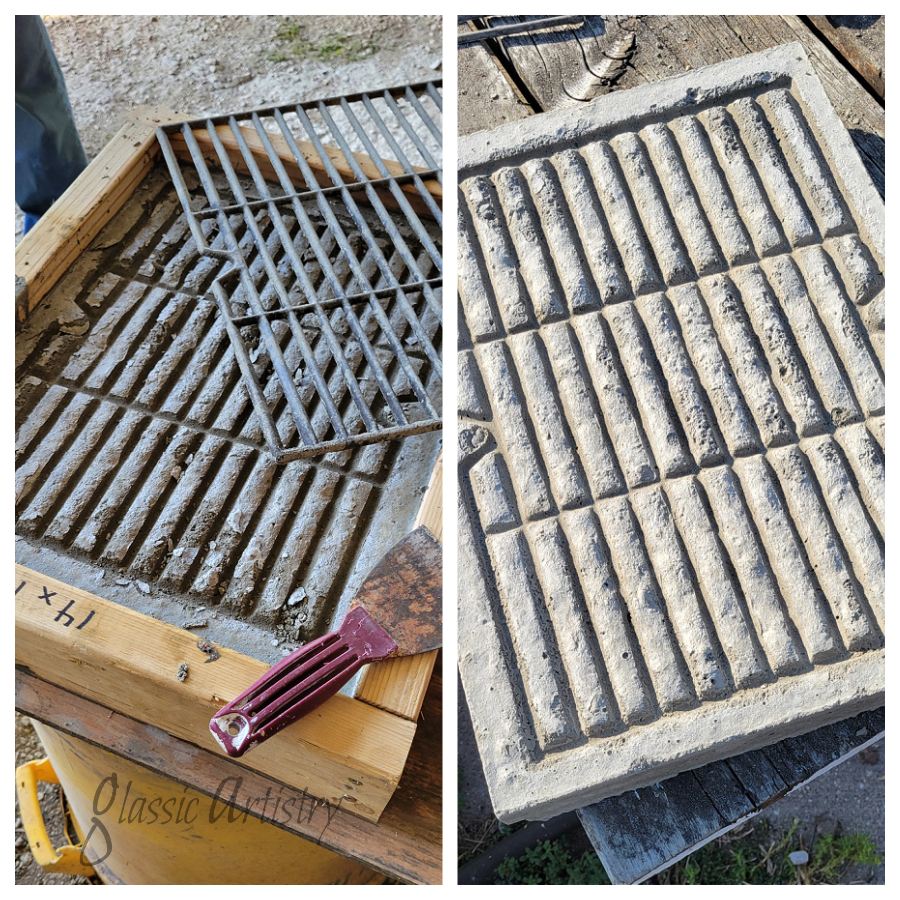
I chose the cast iron grids to experiment with first. They were given a quick swipe or two with a wire brush. I wanted to see if I could easily duplicate the grid pattern and/or embed the grid in the concrete.
I used a half a bag of concrete to embed a small grid in a 10” x 17” form opening. I think I might have pushed it in too far. It didn’t help that I got impatient and tried to unbox it too soon. It’s rougher than I wanted, but it’s fine. It is going to live outside in a garden after all, and I’ll try another one.

Both sides of a larger iron grid were coated with diesel fuel before pushing it into a 14” x 19” concrete filled form. Three quarters of a bag of concrete was used on this one. I had a heck of a time getting the concrete mixed thoroughly in a 5 gal bucket. A pair of stronger hands and arms would have been very helpful; I’ll have to remember that when making this larger stone. The grid came right out though and I’m very pleased with the way it looks.
A handful of hibiscus leaves were laid in the bottom of the last form. It’s probably best to press and flatten the leaves for a little bit before doing this, but, it was a last minute thought and getting late in the day. I’ll surely be doing more of this kind of thing.

That’s all for now. I’m going to need a lot more concrete to keep going and a new form built for the next one I want to try. I’m really looking forward to that one!

Feel free to comment and share. Have a great weekend, I’ll be back soon.

I’m back with a little something random to get the summer season started.
I love watching and listening to all the birds that visit our farm, but I swear the robin population is doubling every year. They are super fast nest builders and will get in every nook they can find. My husband has even had to remove the beginnings of a nest out of the grill of his truck the last few mornings, it’s crazy. They can get a little aggressive when watching over hatchlings learning to fly too. I once had one repeatedly swoop down on the top of my head while I attempted to hang clothes on the line, not realizing her baby was on the ground nearby.
The idea of robin roosts came to mind when we were getting ready to toss a small pile of wood scraps. Why not get a little more use out of the lumber and give our feathered friends a few other options for nesting? It was a plus plus!
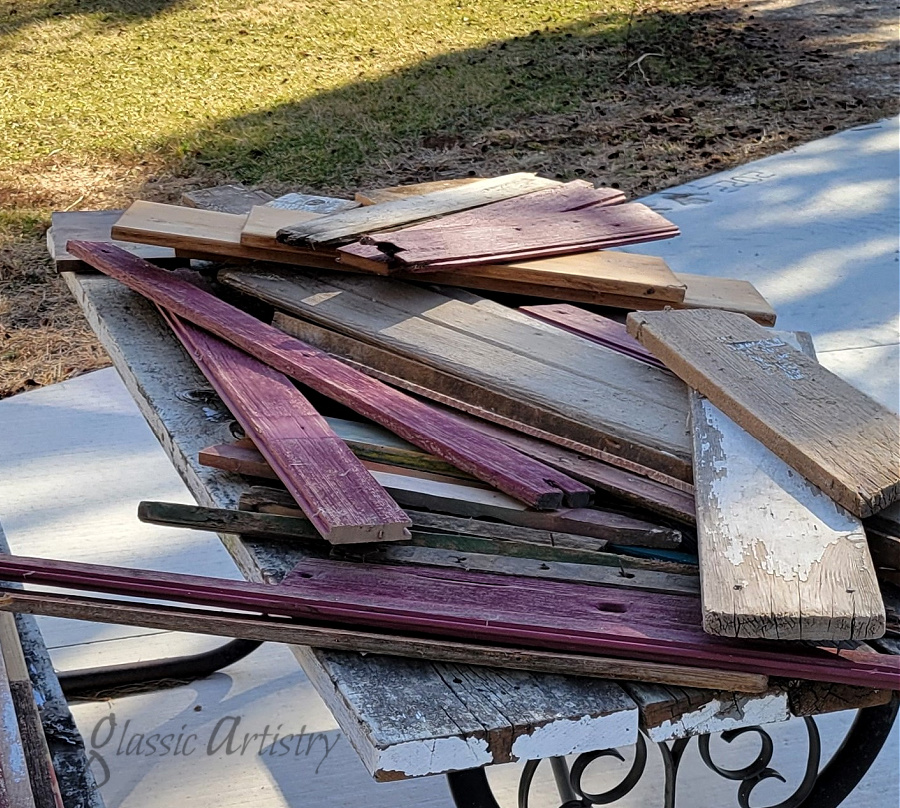
I’d consider this a weekend project; no right or wrong way, just using what you have along with a table saw, nail gun and screws.
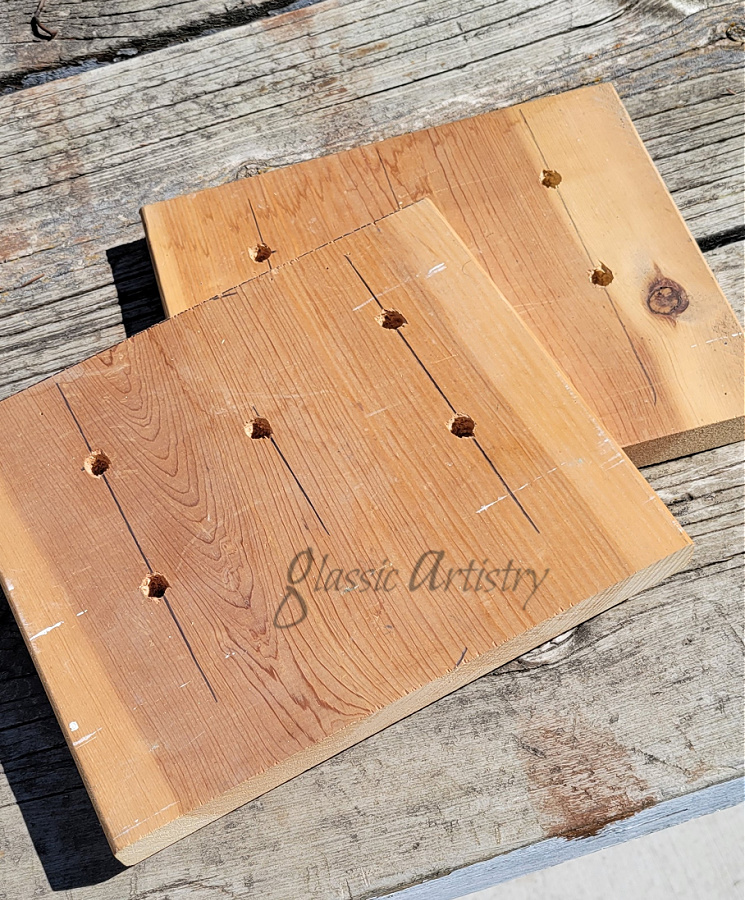
Our widest board in the pile was 9 ¼”. It was cut in 8” increments to use as bases. Five holes were drilled in each piece for drainage.
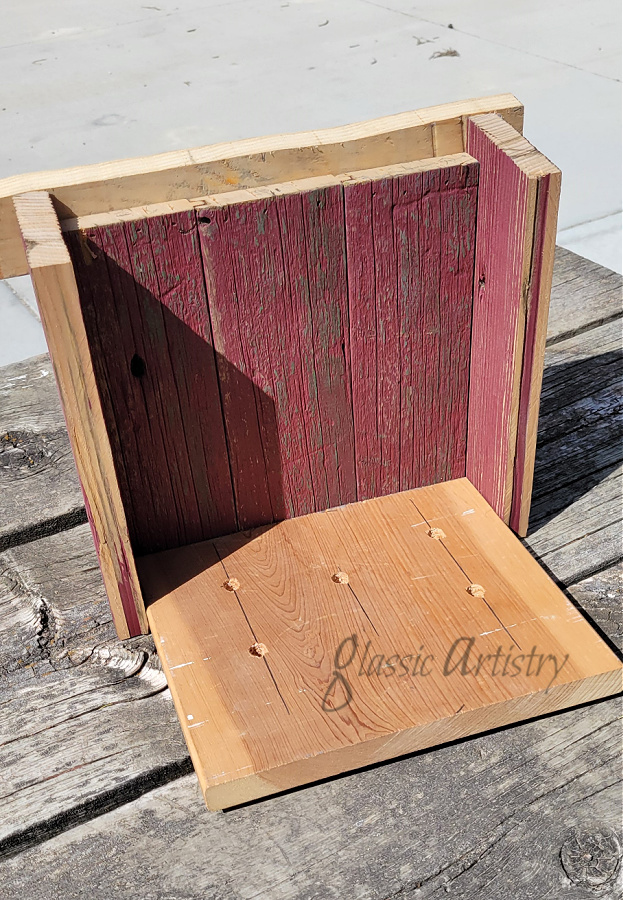
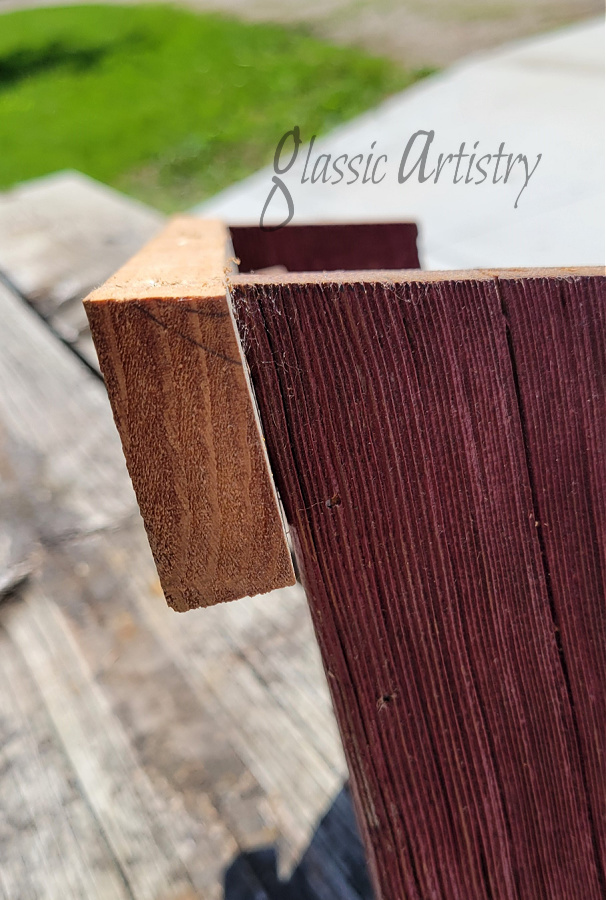
Two house shapes from a past project were in the pile so we started with them. They measured about 10” wide and 12” high at the peak. The shapes were attached to the back of the bases. Tongue and groove pieces were trimmed and attached to the sides. The sides were cut at a slant at the top so a steel roof could lie flat against it.
The other roosts had a square design with tongue and groove attached for the sides and back. A piece of 2” wide lumber was added along the top backside to hold the pieces solidly. We forgot to cut a slanted edge on the 2” piece for the roof when we first put them together and had to remove it, take it to the table saw to trim, and reattach it. There’s always a learning process, right?

The roosts were stained and water proofed, drying over night between steps.
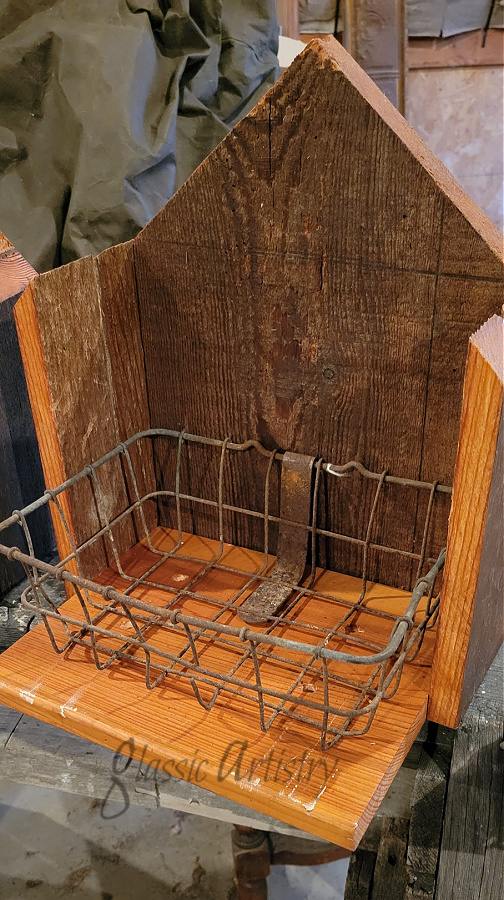
They were a bit plain looking at this point. Vintage hooks, handles, insulators, and a rusty wire basket were added to perk them up BEFORE the roofs went on.
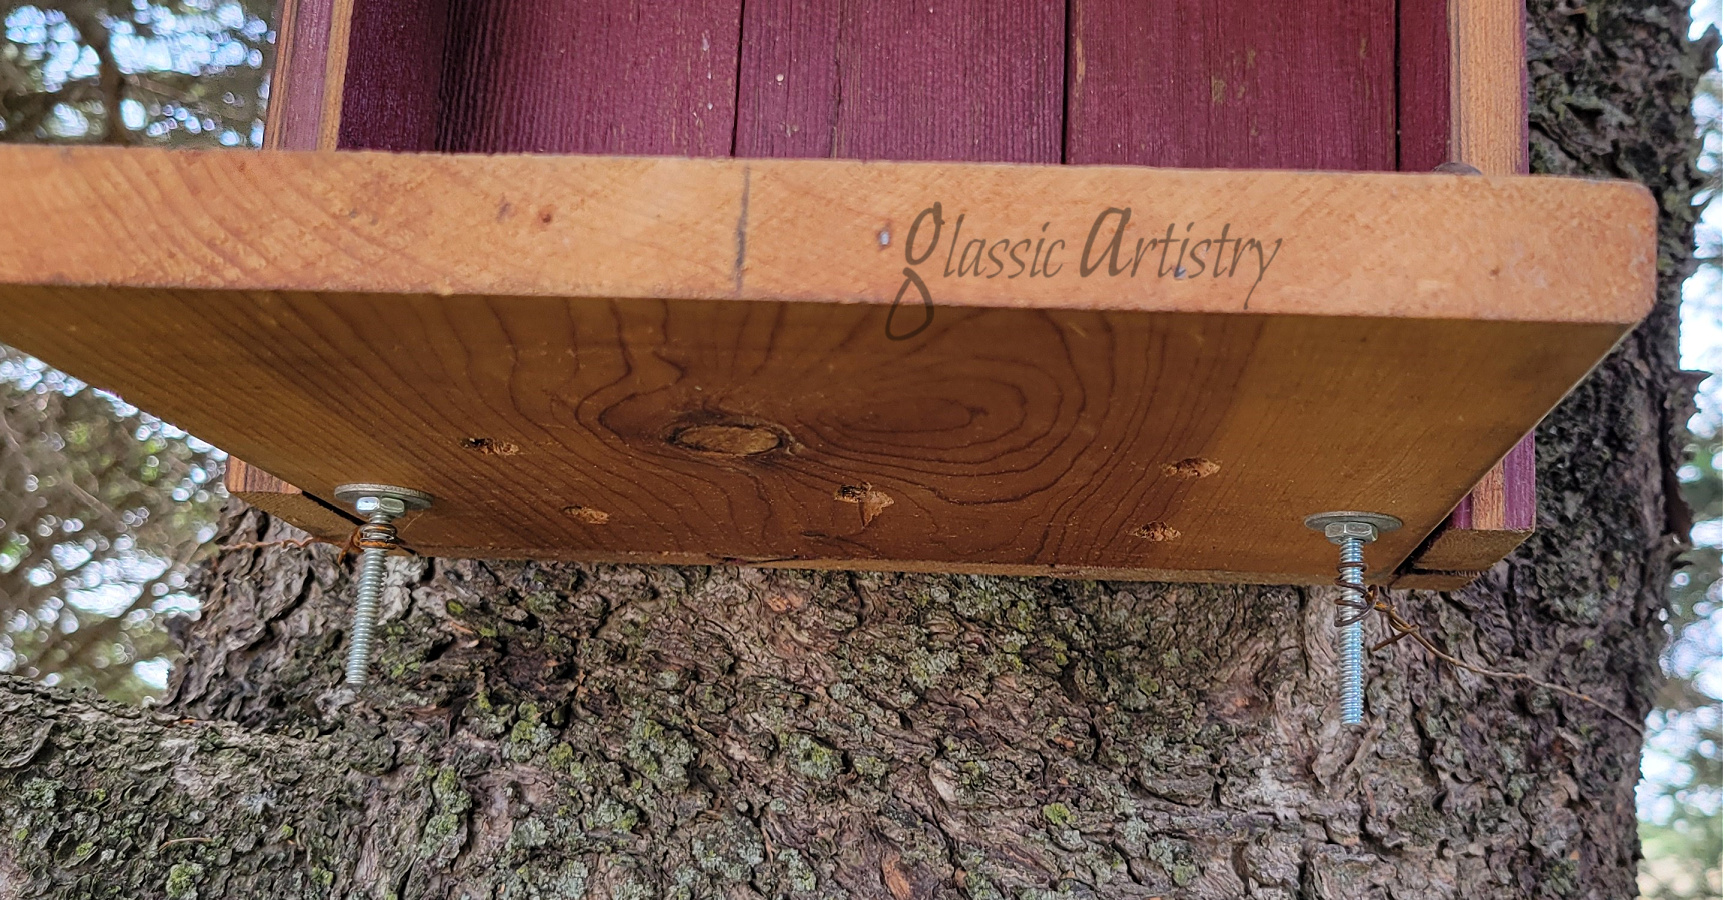
The embellishments helped with my concern about hanging them securely too. One hole on each handle and hook was enlarged so a long bolt could be used in place of a screw. It gets pretty windy here. The length on the bolt will be used for wrapping wire when time to hang.
The added extras may even help hold in nesting materials, who knows?

Steel roofs were cut with tin snips and screwed on. Caution is key when working with steel; the edges can be very sharp.
We lightly smoothed the edges of the steel with a grinder before screwing them on. An eye bolt was centered and screwed through the steel for hanging. A washer can be used under the eye bolt to help it fit more snugly between the steel groves.
A helpful tip for bending steel can be found in one of my previous post https://glassictouch.com/2015/08/10/barn-bird-feeder-with-mini-barn-quilt/.

Per google, it is suggested that robins like their roost to face north or east, 3 to 6 feet off of the ground. I’m not sure it makes that much difference because they are everywhere here. My daughter snagged a couple roosts to hang at her place and we attached ours to yard light poles and an old pine that is due to be replaced in another year or two. A length of wire was wrapped around the tree and wired tightly to the long bolts to hold it secure and prevent rocking in the wind.

Now I’ll be keeping a watchful eye to see if any tenants move in.
I’ve had the winter to mull over hundreds of garden paths and stepping stone ideas. I can’t wait to get back on that project. There’s so many awesome ideas on Pinterest. It’s time to stop looking and start doing.
Feel free to comment, like and share if you so please. It’s fun to hear from readers.
I hope everyone has a fantastic summer!

Playtime!
It was time to do something with a small bucket of AirWick bottles I had saved. I was tempted to toss them, but couldn’t do it without at least experimenting with a few in the kiln.
I’ve only had time to play with two, but I like what’s happening so far. I thought it would be fun to share just in case it could spur imagination or interest with other warm glass or recycled glass friends out there somewhere.
I like to do my experimenting in a small tabletop kiln with a window in the lid. It’s not digital. It has a dial with high, medium, and low, so there is no firing schedule; I just go slow. I use the same type of kiln for all my Christmas ornaments too.
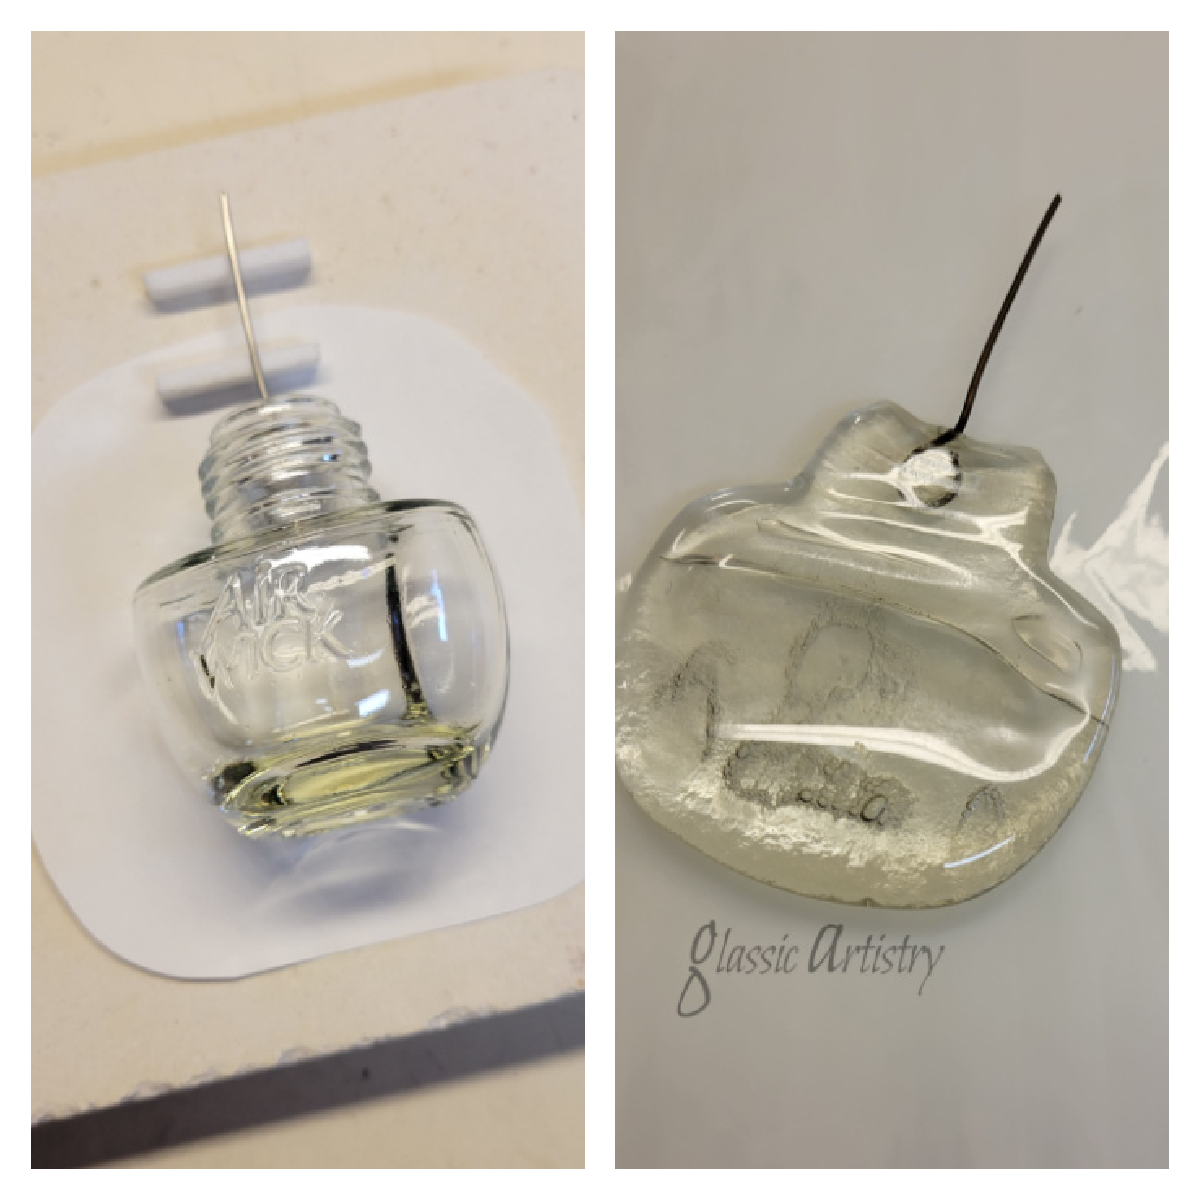
I didn’t expect anything earth shattering, but wanted to see how the bottle flattened before doing anything else. A high temp wire hanger was propped in the opening of the bottle before firing it to about 1600 degrees, just in case it would miraculously round up as a nice glob and the wording melted away. It didn’t, lol. I flipped it over and fired it again the same way and the wording was still there.
The wording finally disappeared after I flipped and fired it a third time. Surprising, it ended up as an uneven clear glob that I plan to use in a rustic Christmas decoration later.
The second bottle was cut into slices with a glass saw to see what could be arranged with them.

Several pieces were laid out to resemble a flower. I thought the bottle opening slice was too tall for the flower center, so it was sliced again.
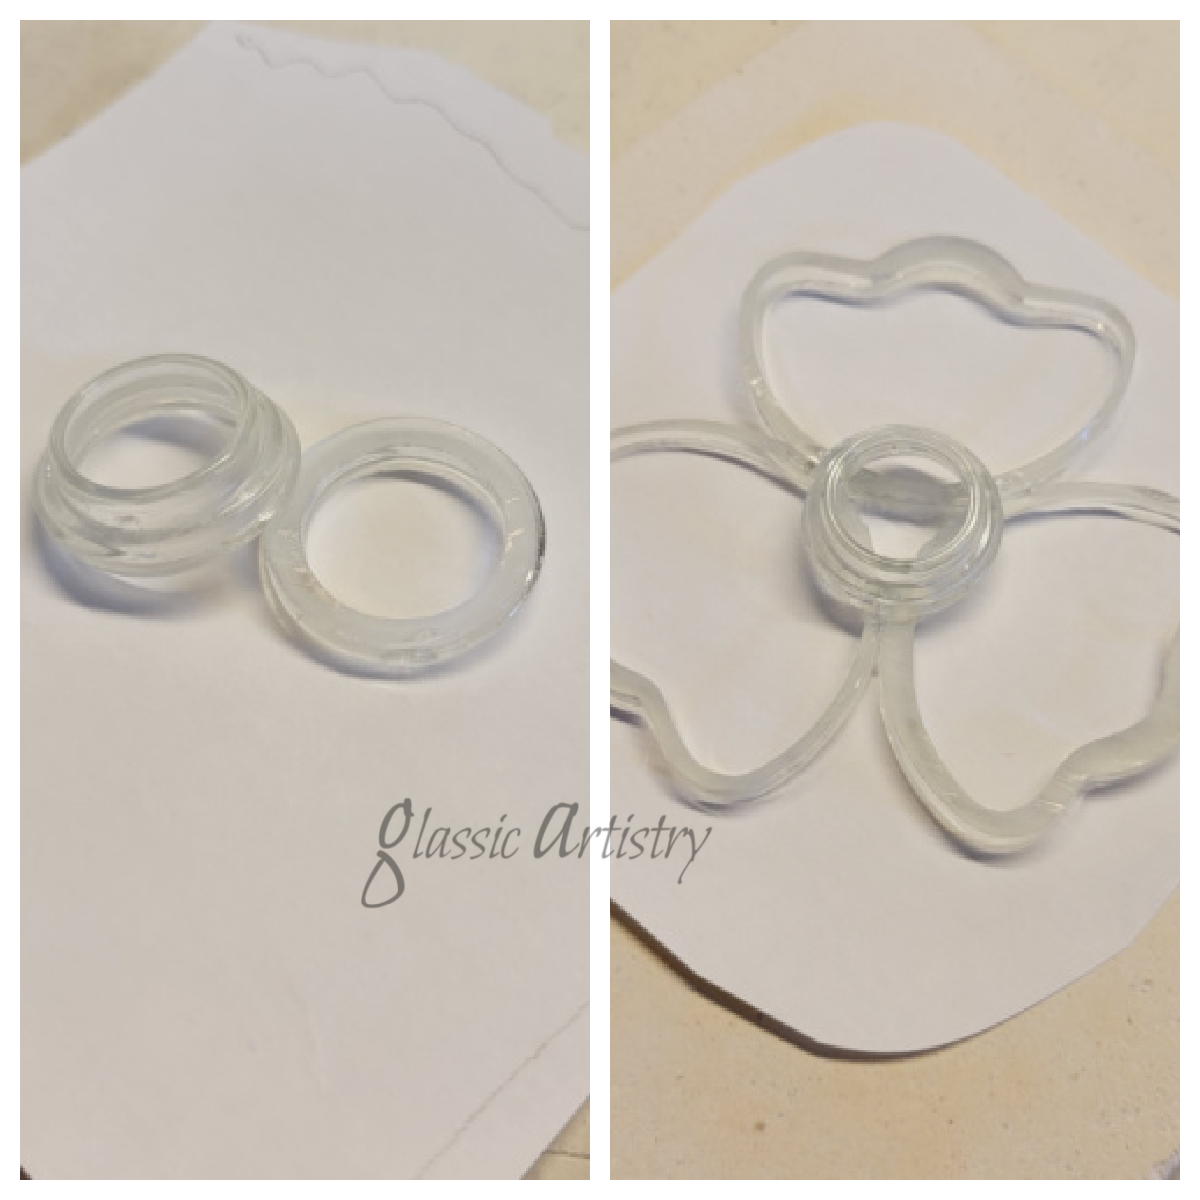
Wanting to maintain its shape and texture, I watched it closely and shut the kiln off at about 1650 – 1700 degrees. I did a quick flash to 1100 degrees, then let it cool completely.

So, what do you think? You can be honest, I have thick skin, lol.
It’s a bit unusual, thin, fragile, and almost weightless, but I like the results. I think it has great possibilities for mixed media or wall art projects. Add some wire, color with glass paints, or even use it as a base and layer over it. I better make a couple more just to be prepared if an idea strikes me. You never know.
I’ll keep experimenting though, there’s extra pieces and more bottles. Stay Well and Be Happy Friends!

So, I did something this summer I hadn’t planned to do. I debated whether to blog it or not, but decided I would just in case they are used in a future project and there was a question about where the materials came from.
I recently found a bunch of textile art supplies/materials I had squirreled away and they’ve got me itchin’ to do some mixed media and make wall art for my home. I’m back to saving scraps of paper and other bits so I have an array to play with this winter.
After a couple years of nursing my garden perennials, they are finally spreading out and filling in spaces. I was admiring all their colors as I mowed around the garden last month when the idea hit me that I should do something with all that pretty.

My first thought was pressing them, which I did in some old books. Then I remembered a dying class my daughter and I attended several years ago that used plants on silk scarves. The silk was wrapped, moistened, and put in a lidded container for 8 weeks; it was a long process.
I skimmed through a couple of YouTube videos and discovered they could be processed in a steamer and that was more to my liking.
Before going further, please keep in mind that I do not claim to be an expert or even experienced in this field. This was done clearly for my own enjoyment.
I made a makeshift steamer out of scrap pieces from my husband’s salvage pile. His salvage business sure does come in handy for me. He keeps it pretty well cleaned up and out of here so I have to look it over and grab quick.
My steamer –

Using white vinegar in a spray bottle, I misted pieces of an old T-shirt and a cotton flour dish towel before laying out the flowers and leaves.
Salt was lightly sprinkled over the flowers along with a heavier sprinkle of alum.

Just for the heck of it, I did another light mist of vinegar too, before rolling them up and tying them tightly. I couldn’t find my white string so raffia was used.

I dampened them lightly with water before steaming, covered, for 2 hours; then left them to cool to room temperature before untying, peeling off the wet flower pieces and giving them a good shaking out.

I tried tying one in a cinnamon roll shape.

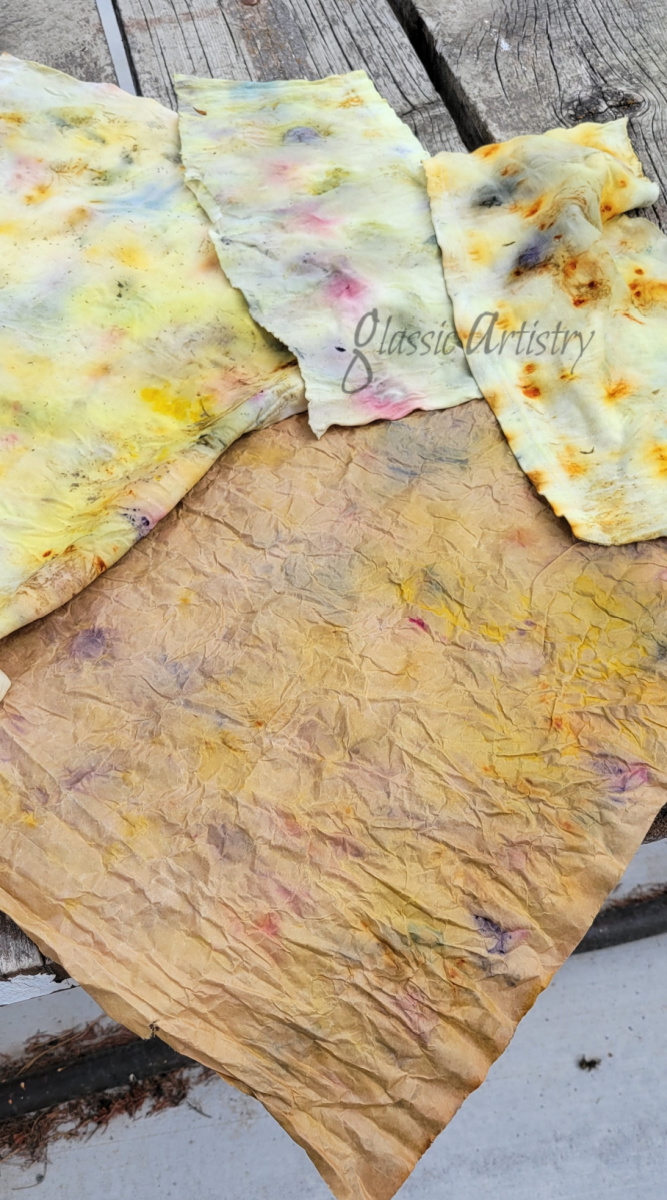
While skimming YouTube, I noticed someone had rolled paper with the fabric to dye too, how cool is that? I had thin brown paper so I gave it a try. I love the results. I can see doing more of something like this.

I let the fabric dry completely before washing on a delicate cold cycle, and dried them in the dryer with an old towel to keep them separated.
I’m sure some pieces of these will be pressed before using them, and others will be kept at the ready for more distressing, stitching, painting, stamping, etc.; whatever is needed.
That’s all for now I guess. The day is getting away from me and I have to get back to my glass work.
Hope you all have a great week ahead friends. Stay Happy and Healthy!
